How do I create a custom report?

You can create a custom report in the New Report section.

Report Types

User Reports:

  • Users – Courses. This report shows the progress details of the selected users, for each course. 
  • Users – Course Enrollment Time. This report is a delay analysis displaying all of the users who have not completed the courses within the required deadline.
  • Groups/Branches – Courses. This report shows the progress details of the selected groups or branches, for each course.
  • Users – Learning Plans. This report shows the progress details of the selected users, for each learning plan.
  • Courses – Users. This report shows the progress details of the selected courses.
  • Users – Training Material. This report relates users to training material monitoring scores and the status of completion for every user. 
  • Users – ILT Sessions. This report shows the progress details of the selected users, for each ILT session. It is also possible to include events.
  • Users. This report shows the details of the selected users, allowing you to extract your users’ data.
  • Sessions - Users Statistics. This report provides session statistics, instructors, maximum enrollments, and session completions

App Reports:

  • Users – Certifications.  The Certification and Retraining App is required to run this report, showing the details of the selected users, for each certification obtained.
  • Certifications – Users. The Certification and Retraining App is required to run this report, showing the details of the certifications obtained, for each user.
  • Users – External Training. The External Training App is required to run this report listing of all the users associated with external activity. 

Begin by accessing the Admin menu from the gear icon in the top right corner of your platform. Then, select the New Reports item in the E-Learning section. In the main Reports page, switch to the CUSTOM REPORTS BUILDER tab, where you can create and manage your custom reports.

  1. Click the plus icon and select the report type. Proceed to the second step by clicking Next.
  2. In the Details step, insert a name and a description for your report. The only mandatory field is Name. When finished, press Create and Edit.

Choosing the filter for your report

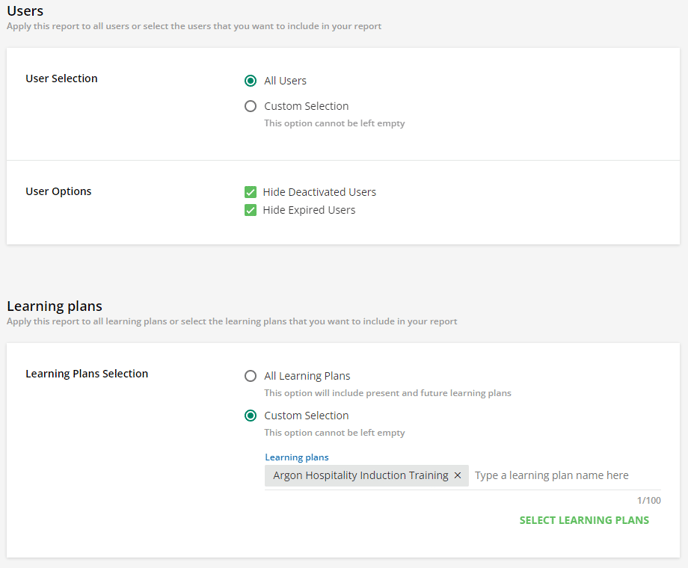
3. Now reach the Filters tab of your custom report page to choose the filters that you want to apply to your report. For example in the Users – Learning Plans report type, filtering User Selection with All users and Learning Plans Selection with Induction Training Learning plan to see who has completed the training.

CreateReport4

The information you see in the filters tab is determined by which type of report you flagged to generate. It could be related to users, courses, enrolment and completion dates, training material types, etc.

Configuring the View Options for Your Report

4. Move to the View Options tab, select the fields that you want to display in your report, and choose the order in which data are shown.

In the Report Fields section of the tab, the fields are grouped according to their area. Please note that the areas differ from report to report, and are determined by which type of report you flagged to generate. Choose the fields you wish to view. Please note that some fields are already selected by default (they will appear grayed out) and cannot be deselected. For instance, in the Users-Learning Plan report, the default fields include Username and Learning Plan Name.

CreateReport3

In the Sorting Options section, you can decide to order the data in the report according to the option proposed (it varies in the different types of reports). You can also choose a custom field for the report sorting from the dropdown menu, where you can select one of the fields you chose in the Report fields section above. Once selected the field, you can choose if you want to apply the ascending (A-Z) or descending (Z-A) order. 

CreateReport2In the Columns Sorting subsection (Sorting Options section), you can configure a custom sorting for the columns in your report. When you select the Configure your custom columns sorting option, the Configure Sorting button will appear below. Once you've clicked it, a panel on the right will appear where you’ll see the list of all of the report fields you previously selected in the different groups of the Report Fields section. Drag & drop the report fields in the list to reorder the columns of your report. When ready, select Confirm to apply the order you chose.


Example

Scheduling a Custom Report

You can schedule when the report will be automatically sent via email. To do so, move to the Schedule tab of your custom report page. Turn on Enable Scheduling for this report toggle in the Activation section.

Define how often you want to send it, type the number of days, weeks, or months, and, in the From field, set the date on which you want to send your report for the first time. In the Start Time field, choose at what hour you wish the report to be generated from the drop-down list.

Add recipients to the report by typing their email addresses in the Recipients section. You can add up to 25 email addresses. Remember to press "Enter" on your keyboard after each email address to save it correctly.

Remember to select Save Changes at the bottom of the page (even if you can also save changes in every single tab). The settings you configured will now be applied to your custom report.

SchedulingReport1